How to Build a DIY Live Edge Table
Learn how to construct a DIY alive border tabular array amongst steel legs. Influenza A virus subtype H5N1 non bad tutorial sharing everything y'all demand to know to brand a modern alive border dining table!

Wow guys! It has been a loooooong fourth dimension since we’ve shared a slice of furniture construct amongst y'all all! It’s non because nosotros don’t receive got ideas! I typically approach renovations past times tackling 1 room at a time. Of course of pedagogy nosotros tackle tons of modest projects inwards between. But typically, nosotros tackle 1 room from flooring to ceiling too therefore motion to the adjacent room. Most of the spaces we’ve tackled late didn’t demand whatever novel slice of furniture pieces. UNTIL nosotros tackled our Dining Room! We desperately wanted to supervene upon our old, worn out dining table, too the solely means to practice that, was to Build a DIY Live Edge Table!

*This post service was sponsored past times Home Depot Canada too may comprise affiliate links. As always, opinions are 100% my own. For to a greater extent than information, delight run across my disclosure page.*
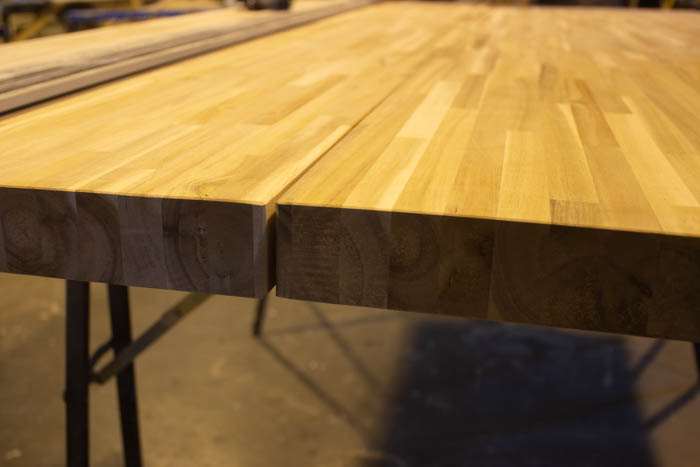
Live border tables receive got ever been popular, too locomote along to grow inwards popularity all the time. The alive border or natural border of a slice of slice of furniture refers to how nosotros construct the natural border of the forest into the blueprint of the piece. Our alive border tabular array is created from 2 slabs amongst manufactured alive edges that await beautiful. The rounded, to a greater extent than natural-looking edges actually serve to add together to a greater extent than or less grapheme to the finished tabletop.
This tabular array was 1 of 3 MAJOR projects that nosotros wanted to tackle inwards only 1 weekend. I figured that nosotros could easily consummate this projection inwards that fourth dimension past times edifice the showtime day, staining too finishing the adjacent day, too giving 1 lastly complete coat on the lastly day. Showing everyone how to construct a modern table, speedily too easily, was actually of import to us.
Sound ambitious? It wasn’t too here’s why: It’s made of solely 4 master copy pieces! Two countertop slabs and 2 steel leg sets! Of course of pedagogy nosotros used a few tools too miscellaneous supplies, but this has to live the EASIEST tabular array build.
Materials needed for a DIY Live Edge Table:
- Two Wood Countertop Live Edge Slabs
(Or y'all could purpose these countertops – cheaper because they are a yoke inches shorter!) - Two Steel Furniture Legs (2-Pack)
- Joining Biscuits
- Stain (we used Varathane Ultimate Stain White Linen)
- Varnish (we used Varathane Professional Clear Finish – Satin)
- Wood Glue
- Spray Paint (or what ever complete y'all wishing for steel legs – nosotros used Rust-Oleum Ultra Cover 2X Matte Black Spray Paint )
- Wood Putty
Tools Needed:
- Track Saw (or could used a circular saw too guide)
- Biscut Jointer
- Orbital Sander
- Belt Sander (Optional – but helps sand smoothen articulation faster)
- Brushes too clothe for staining too varnishing
- Drill too Impact
- Pocket Hole Jig
- Clamps
- Saw/Work Horses

How to Build a DIY Live Edge Table
The step-by-step guide to how to construct a modern tabular array amongst a alive border is listed below. If you’d similar to run across to a greater extent than or less of the highlights from our tabular array building, y'all tin spotter our weekend renovation inwards the Instagram videos here too here.
Start past times unboxing your alive border countertop slabs too placing them on operate horses to larn an thought of size too scale of your pieces.

How to Cut the Width for your DIY Live Edge Table
The width of your alive border tabular array volition depend on your space. We liked the width of our electrical flow dining room table, too chose to brand our novel tabular array a similar width. If y'all wishing a wider table, y'all may non demand to cutting the slabs downwards at all.
Because these are long cuts, y'all may demand to purpose a rail saw. If y'all don’t receive got one, y'all tin clamp a slice of forest downwards to human activity equally a guide. you’re non certain how to practice that, here’s a non bad video to exhibit y'all how to practice it:

How to Join Two Live Edge Slabs Together
The adjacent measuring is to bring together the 2 countertop pieces together to brand 1 large tabletop. If y'all practice this correctly, the seam betwixt the 2 pieces should live virtually invisible!
Biscuit joinery is the best means to ensure a skilful rigid table. If you’ve never done biscuit joinery, or you’re non certain how, this video is a non bad overview!
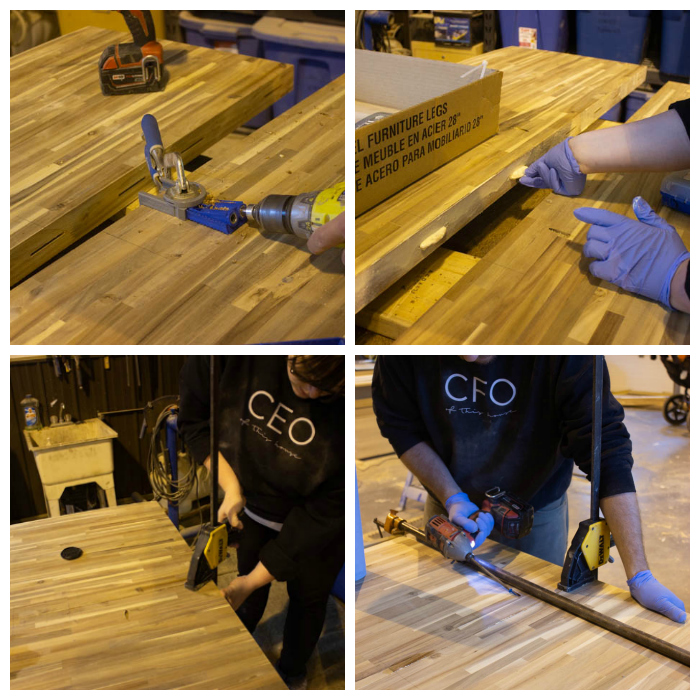
We also added pocket holes to the underside of the table. By having both biscuit joints too pocket hole joinery, nosotros ensured that the tabular array would live built strong, too prevented whatever hereafter bowing of the tabular array slabs.
Sliding the 2 pieces together is when the magic happens! It finally starts to await similar a non bad novel table!
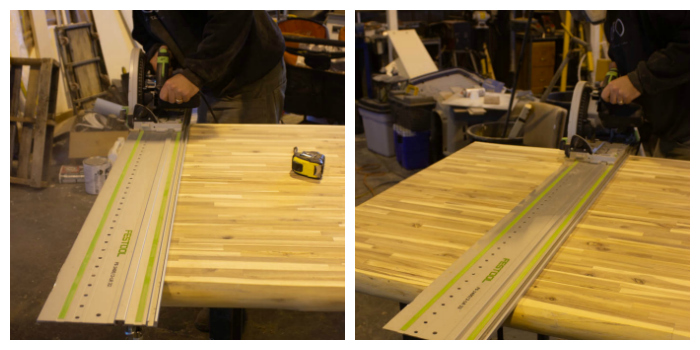
How to Cut the Length of your DIY Live Edge Table
Once the gum sets, it’s fourth dimension to cutting the length of your table. This is a pretty measure cutting using the same tools equally above. We wanted our tabular array to live slightly larger than our one-time dining room table, but y'all tin cutting yours to fit your space.
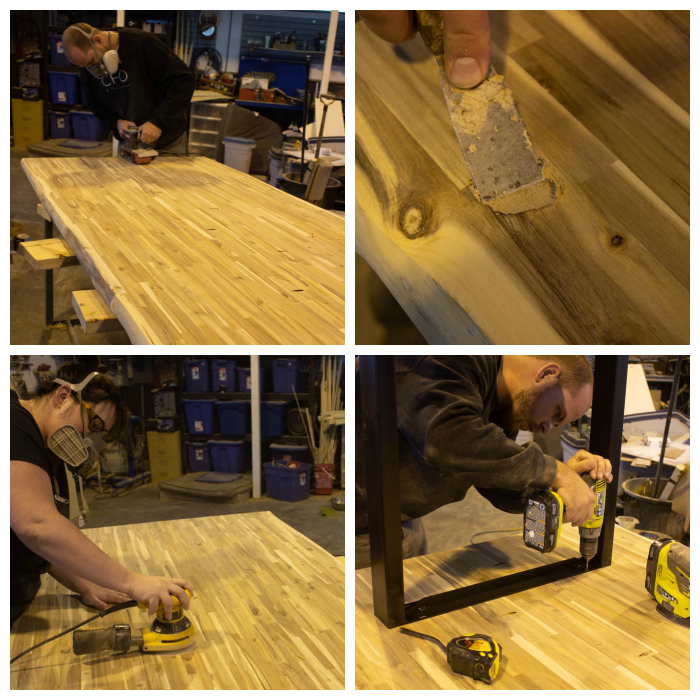
How to Finish Your Live Edge Table
Finishing is 1 of the most of import steps of a construct project! If y'all rush the finishing, all of your difficult operate won’t shine the means y'all wishing it too. This may accept a few rounds of sanding, puttying, too sanding again.
At this signal y'all should also accept the fourth dimension to spray pigment or pulverization coat your legs therefore that they are railroad train to attach to the finished tabletop.
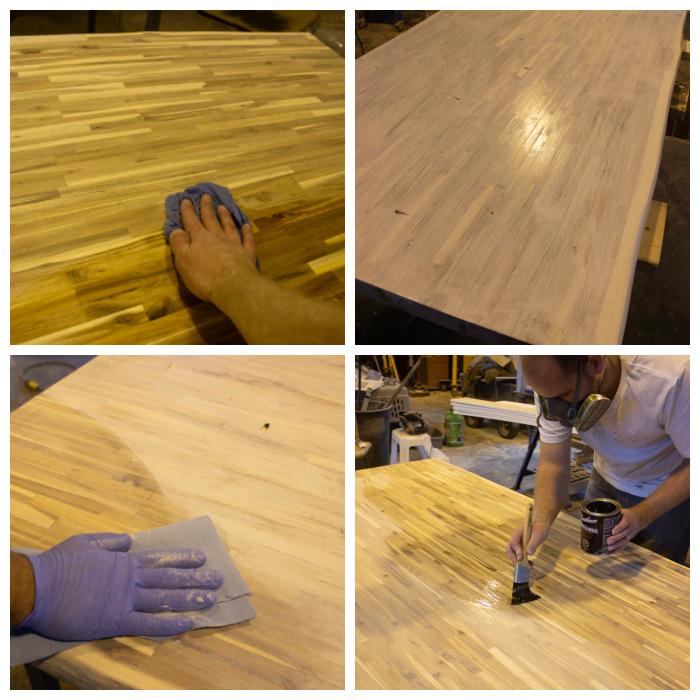
When you’re ready, stain your table. Here’s a non bad step-by-step guide for how to stain a table. We used a White Linen Stain which looked beautiful when it was dry! We wanted the white to actually soak into the wood, therefore nosotros applied a generous amount of stain too allow it sit down for a yoke of minutes earlier nosotros wiped it off. If you’re non certain how long to allow it sit, my proposition would be, a) endeavor it on a fight slice that y'all cutting off first, or b) practice a modest amount too allow it sit down for a shorter amount of fourth dimension first, therefore practice subsequent coatings. You tin ever add together to a greater extent than stain, too each additional layer volition commonly brand your stain deeper.
The lastly measuring is to varnish your tabular array therefore that it’s protected too railroad train to live used on a daily basis.
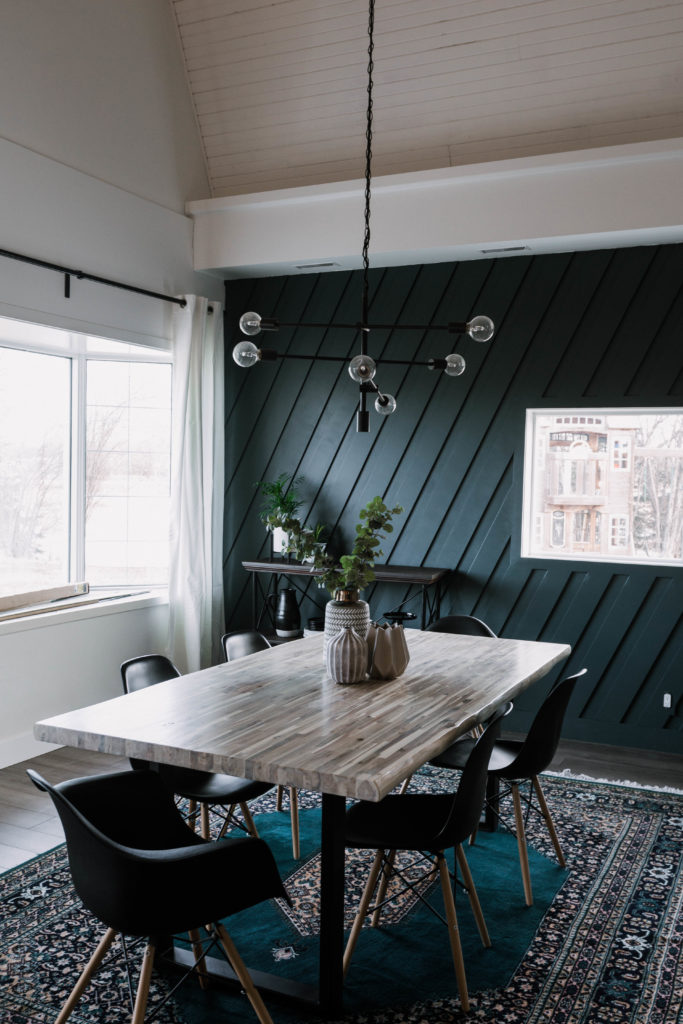
Our Finished DIY Live Edge Table
It was a pleasance showing y'all all how to construct a modern table. We were therefore happy amongst how our tabular array turned out! It was the perfect slice to accent our novel dining room. We did this entire alive border tabular array inwards only 2 days. From cutting to attaching, to sanding too staining. Two days afterward nosotros had a gorgeous tabular array amongst a light, white tabletop.
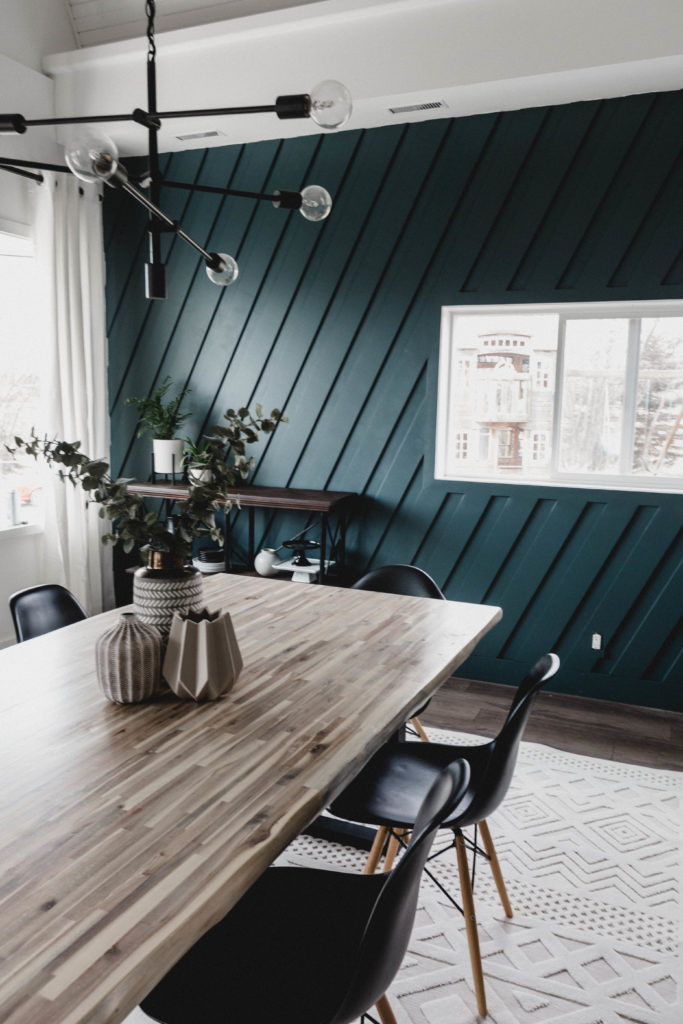
You tin actually run across the alive border item inwards these photos. It’s a beautiful, subtle complete similar this that gives a tabular array character. Since nosotros built this table, we’ve been asked countless times where nosotros bought it, too nosotros ever larn the abide by of saying, “Actually, it’s a DIY! We built it!”.

I promise y'all similar this construct equally much equally nosotros do! There’s nil similar showing off something that y'all built. There actually is solely a few steps involved amongst the DIY alive border table, too the results are amazing. If y'all receive got whatever questions nigh the build, delight ask!

DIY Live Edge Table
Yield:
One Table
Learn how to construct a DIY alive border tabular array amongst steel legs. Influenza A virus subtype H5N1 non bad tutorial sharing everything y'all demand to know to brand a modern alive border dining table!
Materials
Two Wood Countertop Live Edge Slabs
(Or y'all could purpose these countertops - cheaper because they are a yoke inches shorter!)
Two Steel Furniture Legs (2-Pack)
Joining Biscuits
Stain (we used Varathane Ultimate Stain White Linen)
Varnish (we used Varathane Professional Clear Finish - Satin)
Wood Glue
Spray Paint (or what ever complete y'all wishing for steel legs - nosotros used Rust-Oleum Ultra Cover 2X Matte Black Spray Paint )
Wood Putty
Tools
Track Saw (or could used a circular saw too guide)
Biscut Jointer
Orbital Sander
Belt Sander (Optional - but helps sand smoothen articulation faster)
Brushes too clothe for staining too varnishing
Drill too Impact
Pocket Hole Jig
Clamps
Saw/Work Horses
Instructions
- Start past times unboxing your alive border countertop slabs too placing them on operate horses
- The showtime measuring is deciding on the width of your table. The alive border slabs nosotros had were originally 25 1/4" wide. We constitute 50 1/2"too broad for our kitchen tabular array too decided nosotros wanted a lastly tabular array width of forty 1/2", a full of 10" less. We wanted to brand certain that the seam where the 2 slabs met would stay inwards the center, therefore cut 5" off each slab (cut downwards to a lastly width of twenty 1/4").
- We used our rail saw to consummate this cut, however, if y'all don't receive got a rail saw y'all could purpose a circular saw too guide (which could fifty-fifty live a 2x4 clamped to the table!) to brand these long cuts.
- Next, nosotros added biscuit joints to strengthen the connectedness betwixt the 2 slabs. Mark out where y'all wishing your biscuit joints to be. We wanted a articulation 4" from each terminate too than at every 12" throughout the slab.
- Cut your biscuit slots therefore the biscuit is inwards the centre (from laissez passer on to bottom) of the alive border slab. You may wishing to purpose a fight slice of forest that is the same thickness equally your alive border slab showtime to ensure the biscuit is cutting inwards the right position.
- Using a pocket jig drill pockets holes inwards the bottom side of your table. Ensure these don't draw of piece of job upwards amongst the biscuit slots. We position them inwards betwixt all the biscuit slots too at the ends of the alive border slab. We alternated which slab nosotros drilled the pocket holes from equally nosotros went. By having both biscuit joints too pocket hole joinery, nosotros ensured that the tabular array would live built strong, too prevented whatever hereafter bowing of the tabular array slabs.
- Glue too install your biscuits into the cutting slots. You tin also gum the edges of alive border slab at this points also.
- Slide both alive border slabs together too screw the pocket jigs. You should instantly clamp your tabular array to ensure a squeamish tight fit 1 time the gum dries.
- Once the gum sets (follow the manufactures recommendations) grade out the length of your table. We decided on cutting ours to 80" inwards length (slab originally was 96"). Again a rail saw plant best but y'all tin purpose a circular saw too guide to consummate this cutting if y'all don't receive got one.
- Once your gum is dry, sand the centre of the tabular array to ensure a squeamish smoothen articulation betwixt both slabs. You volition probable receive got to a greater extent than or less gum that seeped out on both sides after clamping, y'all you'll wishing to larn those all smoothed out. You tin start amongst a belt sander (but live careful equally it removes stuff fast!). Or only purpose a orbital sander starting amongst lx girt sand paper, too moving upwards to 100, too therefore 220 grit sand newspaper until y'all larn to a squeamish smoothen finish. Sand the entire top, bottom, too ends of the alive slab tabletop.
- Flip your tabular array therefore that the laissez passer on is facing upwards. Fill whatever cracks inwards the tabular array amongst forest putty. We receive got constitute that the best means to fill upwards these cracks is to mix natural forest putty too dust from your sander (if your sander has a dust collection bag). This puts to a greater extent than or less of the forest particles into your putty, too allows the stain afterward on to live a closer coloring stuff tally to the residuum of the table. Large putty marks on a tabletop ever stand upwards out inwards a not-so-good way. Finally, sand the tabular array smoothen after the putty dries.
- Paint and/or protect your steel tabular array legs. We spray painted ours too it took nigh 3 coats to larn a squeamish finish. You could also ship the legs out to larn them pulverization coated too that would outcome inwards a to a greater extent than durable finish.
- Flip your tabular array therefore the underside is exposed. Layout your legs out where y'all wishing them. We laid our legs dorsum 9" (from the terminate of tabular array to front end of legs) or 12" (end of tabular array to centerline of legs). We would this distance to both await nice, too live comfortable for the somebody inwards the terminate chair at the tabular array (e.g. no tabular array legs inwards their knees or anything!). Screw your legs inwards place. too pre drill the holes for the supplied screws.
- Wipe the tabular array downwards amongst a damp stuff to prep for stain. Depending on your desired complete too stain selection y'all may wishing to purpose a forest conditioner prior to apply stain. We did non purpose 1 inwards this case, but it does opened upwards assist railroad train the forest to accept inwards stain. If y'all are testing stains on a spare slice of wood, nosotros would highly recommended testing the stains amongst the conditioner underneath (if y'all computer programme to purpose it) equally good equally amongst the clear complete on top. Both of these products could slightly alteration the lastly await of the piece.
- When you're ready, stain your table. We used a White Linen Stain.
- Once the stain is laid give the alive border tabular array a coat of varnish, allow it cure, too therefore give it a low-cal sand amongst 220 grit sand newspaper too apply a 2nd coat of varnish. Follow manufactures directions for stain cure times too application directions if needed.
Don’t forget to cheque out the entire post service on HOW TO RENOVATE YOUR DINING ROOM IN Influenza A virus subtype H5N1 WEEKEND!
If y'all savour woodworking, y'all may savour our IKEA shelf hack! How to Make Your Own Wooden Floating Shelves!


Comments
Post a Comment