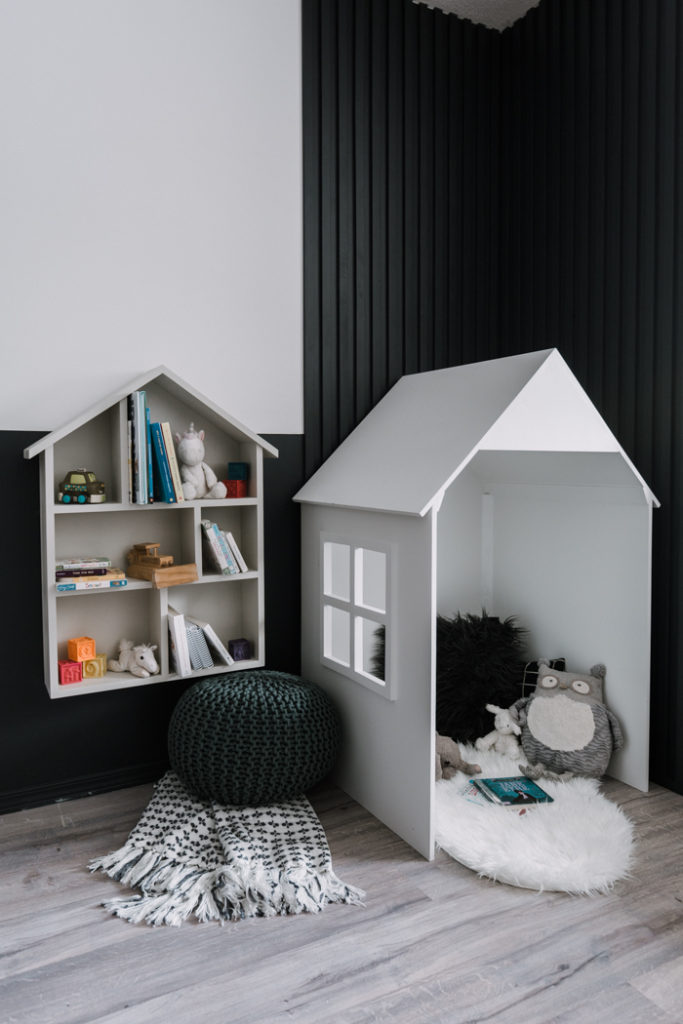
DIY Kids Indoor Playhouse
Build this DIY Kids Indoor Playhouse inwards no time! This simple, modern playhouse is perfect for the bedroom, playroom, basement or reading nook.

When I was a kid, I dreamed of having a playhouse. Spoiler alert: I never got one. My blood brother too I would construct giant cardboard houses, too forts nether the stairs. We would live devastated when individual knocked it downward or broke it. I volition never, ever halt giving my kiddos cardboard boxes to play with, but I also wanted to give them a fun identify to play too enshroud that couldn’t live destroyed. We built this DIY Kids Indoor Playhouse inwards simply 2 days too our kids LOVE it!

*This post was sponsored past times DAP Canada too may incorporate affiliate links. Thank yous for supporting our weblog thence that nosotros tin move on to select yous posts similar these. For to a greater extent than information, delight consider our disclosure page.*
Have yous seen a lilliputian kids tent inwards someone’s home? They are thence popular, too at that topographic point are a ton of actually beautiful ones out at that topographic point now! Since I’m a DIYer, I thought I would displace my paw at one. I spent an entire afternoon sewing i simply to realize that all of my measurements were off too it was a consummate flop! lol. #pinterestfail
After that, I realized that mayhap I should revamp my thought to something that suited our science laid a fleck more…. thence Russ too I decided to construct a lilliputian playhouse for the kids. Someone that they could play too read. And something that looked cool too modern to us!
This lilliputian playhouse was born, too was such a fun projection to construct too secretly break to the kids!
How to Build a DIY Indoor Playhouse
The construct plans for these houses are available for costless below too all of the instructions are available below inwards the printable box!
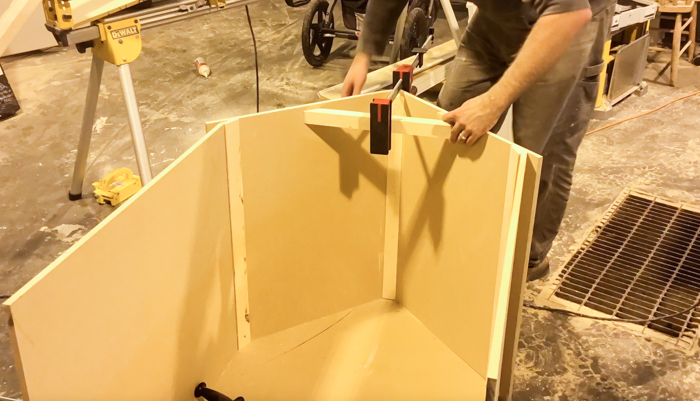
Overall the projection was super slow to do. We simply cutting the MDF boards downward to size next the construct plans, attached them, too and then cutting too added all of the reinforcement pieces to the corners too joints.
We also cutting a window out of the side, which is totally optional. You tin add together i too switch it to the other side depending on your room, or add together i to all iii sides if yous want!

Some of the tools that nosotros couldn’t create got completed this projection without are the DAP® WOODPRO® All Purpose Latex Wood Filler, the Fast Dry White Acrylic Latex Plus Silicone Caulk, too the DAP PRO Caulk® eight Piece Caulking Tool Kit.
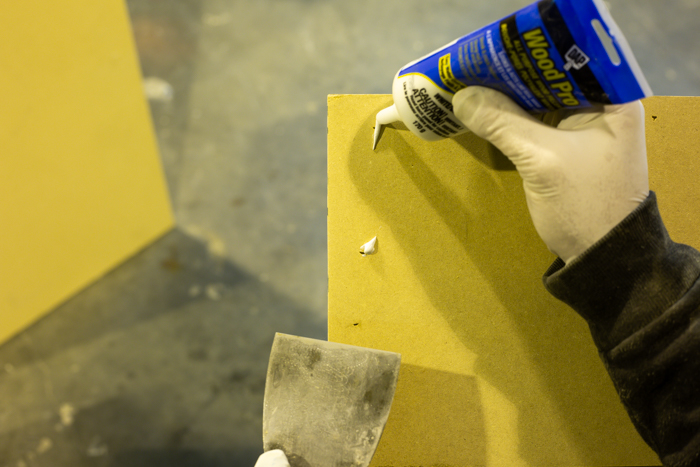
Once the menage was built too assembled, nosotros used the WoodPro woods filler to create total all of the boom holes inwards the MDF. We simply dabbed a fleck on, spread it amongst the putty knife, too permit it dry. When it was dry, nosotros sanded it downward thence that nosotros were ready to paint.

We also used the caulking inwards all of the edges too corners. The caulking fills all of the pocket-size imperfections too gaps, too gives everything a dainty crisp look, improving the overall destination of the build.
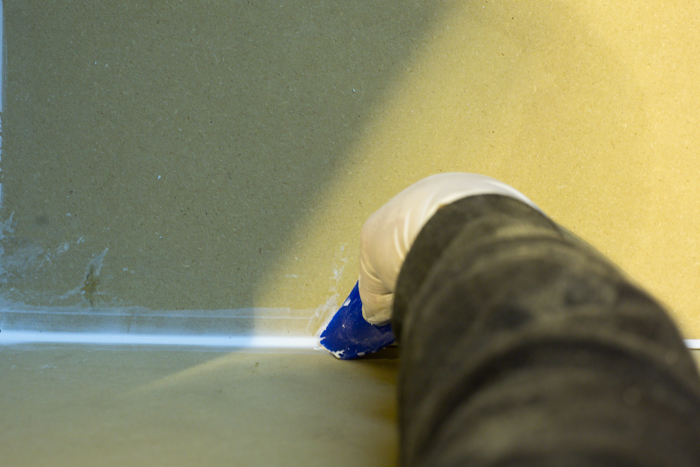
And if yous create got one, these lilliputian sealing tools for caulking, you’ll live thence glad! Save your fingers too start using i of these to fighting an fifty-fifty business of caulking across your corners from at nowadays on! It made for a perfect finish!

When you’re done, pigment the entire playhouse whatever colour yous like. We used our pigment sprayer too spray tent to pigment it quickly, but yous tin definitely scroll it or brush it if yous wish.
Our Finished Playhouse
I could non live happier amongst this project! In retrospect, this construct feels so much to a greater extent than similar “us”, than the tent projection did!
The blueprint is cute, clean, too modern, too the kids LOVE playing inwards it too peeking through the window at i another!


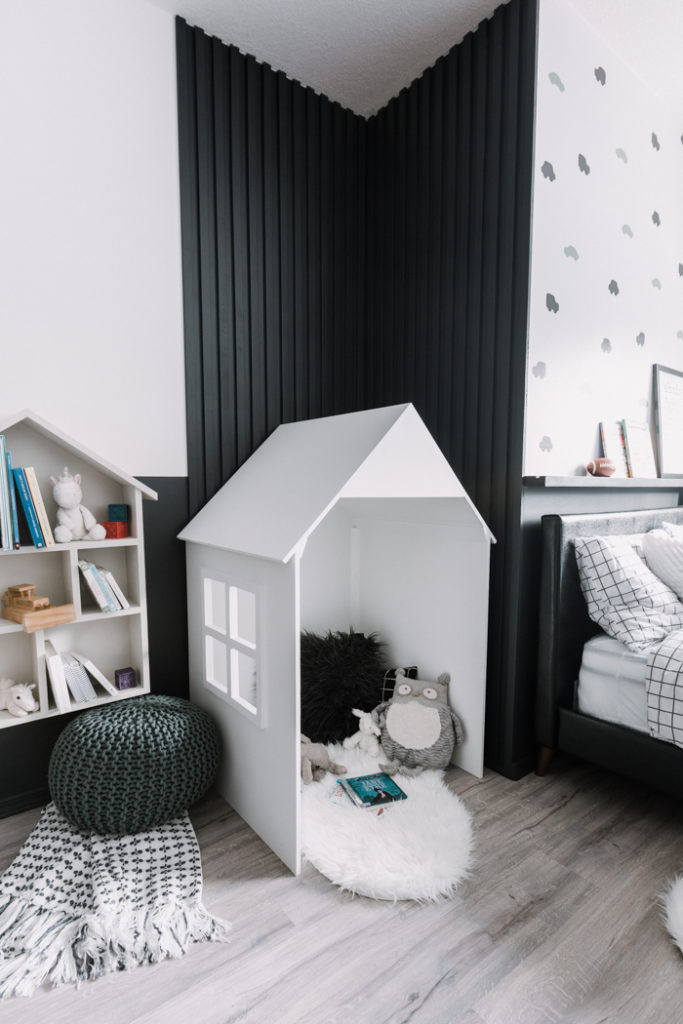
I tried to accept a few candid shots of the kids spell they were playing inwards it too! It’s thence cute to consider them all snuggled inwards at that topographic point together!


Kids Indoor Playhouse Build Plans
Our kids are loving their novel playhouse! We actually wanted to portion the plans earlier the vacation season, thence that anyone who wanted to construct this lilliputian playhouse every bit a Christmas gift could!
The construct plans are costless for anyone that joins are email list! The plans volition live available to download immediately.
Enjoy!

Kids Indoor Playhouse
Yield:
Kids Indoor Play House
Prep Time:
3 hours
Total Time:
3 hours
Difficulty:
Medium
Estimated Cost:
$125
Build this DIY Kids Indoor Playhouse inwards no time! This simple, modern playhouse is perfect for the bedroom, playroom, basement or reading nook.
Materials
Two sheets of 4'x8' MDF x 1/2" thick
Two 2'x4' x 8'
DAP WoodPro Latex Wood Filler
DAP Alex Fast Dry White Acrylic Latex Plus Silicone Caulk
DAP PRO Caulk® eight Piece Caulking Tool Kit
DAP Weldwood Original Wood Glue
Primer
Paint
Tools
Table Saw
Feather Board (optional)
Mitre Saw
Drill
Brad Nailer
Jig Saw
Sander
Putty Knife
Paint sprayer or brush too roller
Paint Spray Booth(Optional)
Instructions
- Cut downward your MDF sheets into the pieces shown inwards the construct plans. Note that simply about of the pieces create got a 45 score angle cutting into them - consider drawings for details.
- Begin Assembly amongst 2 sides (Parts D) too dorsum (Part E). Using clamps (or a helper if yous create got access to simply about other laid of hands) concur the pieces together. Part eastward volition sit down inwards betwixt Parts D. Glue too brad boom the edges together.
- With the sides (Part D) too dorsum (Part E) inwards identify yous tin at nowadays identify the roof panels (part C) on the top. Glue all the edges too boom into place.
- With the frame built yous tin start out reinforcing the joints/edges amongst Parts A, B, too G. Cut Part G from a 2x4 too install around the tiptop of the roof every bit per the drawings. Holding it aeroplane too screw into place. You volition necessitate to laid it dorsum 1/2" to allow for Part F to sit down even amongst the roof edges.
- Cut Part H5N1 too B from a 2x4 using your tabular array saw. For Part H5N1 yous volition cutting the 2 22.5 score angles first, too then cutting it downward to width. You may desire to job a plume board to assist concur the slice against the fence. You tin job this same physical care for to cutting Part B, but volition cutting to 45 score angles on the i human face upwardly instead of the 22.5 score angle.
- Cut the Parts B to length too install inwards the both corners where Parts D too eastward meet. I used gum too brad nails to secure.
- Cut Parts H5N1 to length too install at the border where Parts D too C meet. I used gum too brad nails to secure.
- Take Part F too gum the edges, too boom into identify around the Peak every bit shown inwards the drawings.
- (OPTIONAL) We installed a window on the i side of Part D, yous tin install a window on i side, both sides, all sides, or none depending on how yous desire your lastly menage to look. The physical care for would live the same for each window. To cut/install a window locate too depict out the 4 holes inwards the side(s) yous wishing to create got a window in. I job a drill fleck the same diameter every bit my jig saw blade to drill out the 4 corers of each window hole (16 holes inwards total). The within "cross" is 1" thick (TYP). Once yous create got the holes drilled yous tin job a Jig Saw to cutting out the 4 holes. Once the holes are cutting I used simply about of the fighting MDF left over too cutting 1" broad strips. I used these strips to blockout/trim the window frame. These were glued too nailed into place.
- Let gum dry out (follow the recommend cure time)
- Fill all the boom holes amongst DAP WoodPro Latex Wood Filler too a Putty Knife. Let woods filler dry out too sand areas smooth. yous tin also job the woods filler to create total inwards the areas on the window frame to arrive expect similar i slice (no visible joints).
- Using DAP ALEX FAST DRY™ Acrylic Latex Caulk Plus Silicone identify caulking along all the edges, joints, too whatever areas where yous may necessitate to create total inwards gaps. Use the radius sealing tool from DAP PRO Caulk® eight Piece Caulking Tool Kit to smoothen all the caulk. We used the Standard radius (round) destination but yous tin job whatever of the corner profiles yous mean value looks best for your project
- Once the caulking is dry out give the menage a lite sand too prep it for primer. I ever recommend using a primer starting fourth dimension when edifice amongst MDF. The pigment too primer all inwards i products I create got used inwards the past times simply don't seem to encompass every bit nice. Priming starting fourth dimension all gives yous a run a hazard to laid upwardly whatever defects that present upwardly i time yous prime number too earlier yous apply the lastly top coat.Using a pigment sprayer too booth actually speeds upwardly the icon physical care for too gives a peachy lastly look. The booth helps command over spray too industrial plant peachy for a projection similar this.
- Once the primer is dry out yous tin pigment the house. Once the pigment is dry out displace it into your kids room too permit them relish for hours of fun!
Notes
Before building, double banking enterprise check the door opening of the room yous desire this menage to larn in. Our kids room door opening was 30" broad thence nosotros designed the menage to tally through that (it is 29" wide). But door opening tin vary from 24" to 36" thence yous may desire to banking enterprise check the doors yous necessitate to displace through starting fourth dimension to ensure yous tin identify it inwards your home.
Download costless construct plans at Lovecreatecelebrate.com
Recommended Products
As an Amazon Associate too fellow member of other affiliate programs, I earn from qualifying purchases.

Alex Fast Dry Acrylic Latex Caulk Plus Silicone - White
DAP White All Purpose Wood Filler
DAP eight Piece PRO Caulk Tool Kit
DAP Weldwood Carpenters Glue
Mitre Saw
Table Saw
Ryobi 3 Piece 18V One+ Airstrike Brad Nailer Kit
Orbital Sander
Stanley Tools FatMax Tape Measure
HomeRight Super Finish Max Paint Sprayer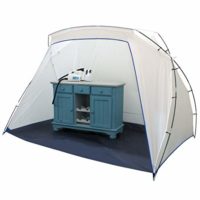
Spray Tent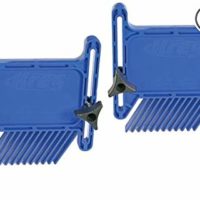
Kreg Featherboard
If yous haven’t seen how nosotros transformed this bedchamber inwards simply THREE DAYS, too then yous necessitate to banking enterprise check out our latest WEEKEND MAKEOVER!
You tin also consider the kids reactions to their new bedchamber too novel playhouse inwards a video!


Comments
Post a Comment